If you are a Procreate artist or want to be a Procreate artist, you must face a multi-layer problem. It is challenging to find the correct layer, and selecting layers among them is very difficult. It is an overwhelming and time-consuming process that takes a lot of energy. But if there is a problem, there is a solution. We can easily group a couple of layers and move them or copy them with a click to further find them easily. In this article, we will discuss how to select multiple layers. Copy, move, and group in Procreate.

here is how you select, move, and group many layers in Procreate simultaneously. Make sure to keep reading until the end to understand all the tips.
You can select multiple layers in Procreate by dragging them to the right with your finger or the stylus; you can do this with any device. A blue highlight will appear on each layer when you pull the slider to indicate which one is currently selected.
What are the different layers in Procreate?
If you’re familiar with them, Procreate Layers function similarly to how they sound; they let you layer multiple pieces of art on top of each other while preserving some degree of independence between the layers.
I could, for instance, sketch something on one layer and then create a new layer for more artwork on a separate one after that.
The two layers might be moved and modified individually at that point, in contrast to how they would be treated as a single, interdependent piece of work in a shared environment.

Tap on the Layers Icon, located in the top right-hand corner of your work area, to see your Layers.
How to Add a Layer in Procreate?
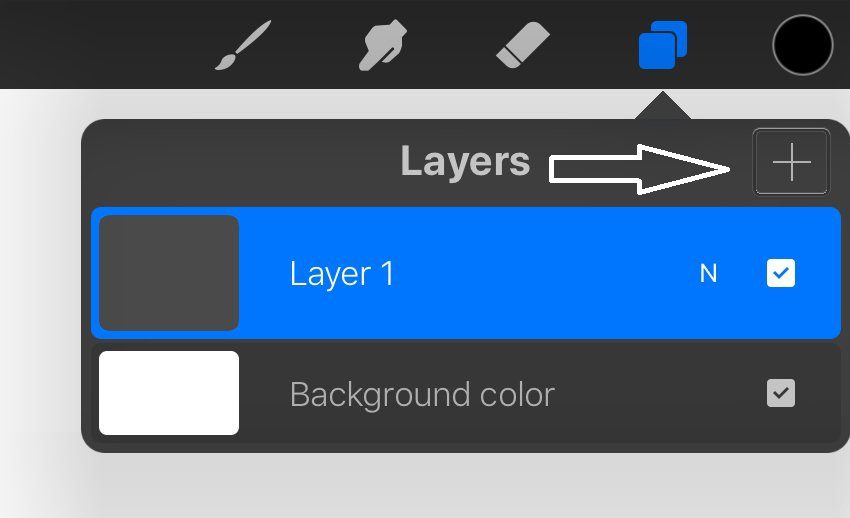
When you create a new document, you’ll find two layers by default(on the top of the right corner): Layer 1 and the Background Color. Please take note that the layer you have picked is marked in blue.
We can build a new layer by tapping the + sign in our Layers Menu.
How To Select Multiple Layers in Procreate?
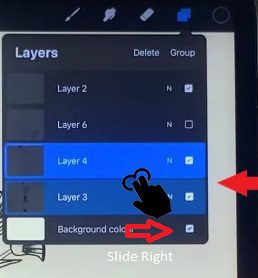
To select multiple layers in Procreate, you have to slide right to each layer you’d like to choose; it will highlight all the selected layers in blue, indicating the chosen layers. You can then deselect the layers by sliding them to the right again.
It was the short answer on selecting multiple layers in Procreate. Now I will discuss with an explanation and guide you with full details.
Step 1: Open the Layers Menu in Procreate
The first thing you need to do to select several layers is to open the Layers menu, which is found in the top-right corner of your screen:
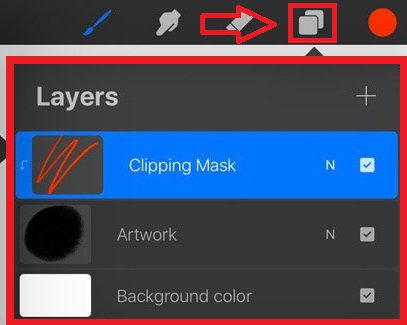
if the layer is selected by default, then it will be indicated with blue colour
Step 2: Slide layers to the right to choose them
After opening the Layers menu, all that is required of you to choose several layers at the same time is to tap and drag the layer to the right:
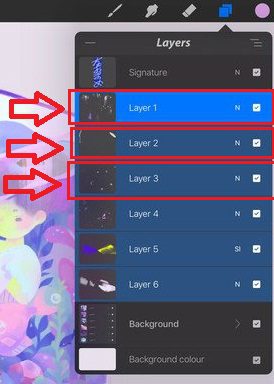
The layers you have chosen will be highlighted in blue, as seen in the screenshot just before.
On the other hand, the further selected layers use a blue colour that has been a little light shade.
The primary layer that was there, to begin with, has not changed its colour of blue.
And that wraps things up! You have picked several layers, and at this point, you are free to do anything you want with them.
What are the benefits of selecting multiple layers?
Layers are helpful because they enable you to add components to a picture and work on them one at a time, all without making permanent changes to the image that you are working on.
Adjusting the colour and brightness of each layer, applying special effects, repositioning the content of layers, specifying opacity and blending values, and so on are all possible for each layer.
Layers are clear glass sheets on which you may paint. Transparent layers may be seen through. You may experiment with each layer to get the desired look. Before merging, each layer is separate. The background layer is always locked, so you can’t modify its stacking order, blending mode, or opacity (unless you convert it into a regular layer)
So selecting multiple layers helps you make changes together while changing in one layer. You can change colour brightness and many more things you can do.
How to Move Multiple Layers in Procreate?
To group all of your chosen layers, keep your finger pressed to one of them for a few seconds. On the above right corner, click on the group, and then You may move them about in the layers panel until you find the proper position. As soon as you lift your finger, your layers come together.
Now let’s go to more details on how to move multiple layers in Procreate
To push various, you have to make sure that you have selected multiple layers that we mentioned above
After you have finished selecting your layers, you may start rearranging them.
To group all of your chosen layers, keep your finger pressed to one of them for a few seconds. As though they have merged out of the layers panel altogether. You may move them about in the layers panel until you find the correct position. As soon as you lift your finger, you’ll have your layers come together.
After selecting your layers, you can also put them into a group; let’s see how to group them.
How to Group Multiple Layers in Procreate?
To group your layers in Procreate, start by swiping right on all the layers you want to group. At the top of the Layers panel, select the Group option. By default, all of your layers will be grouped into a new group called “New group”. If necessary, rename this group.
So the option of grouping your layers rather than moving them. After you have checked your appropriate layers, go to the top of your layers panel and click the Group option. Make sure you don’t accidentally press the Delete button.
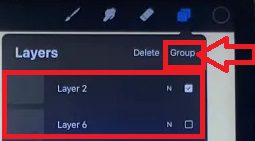
You will find that your layers fall into a group once you’ve grouped them. This group will be named”New group” by default.
Double-tap on the name “New group” to rename this group to access the options.
Rename your group by clicking the “Rename” option and giving it a new name that suits your needs.
What Is The Maximum Number of Layers in Procreate?
Several factors limit the number of layers in Procreate. Including the amount of RAM on your iPad, the size of your canvas, and the DPI (Dots Per Inch). The layer restrictions aid performance and reduce the risk of a crash; a bespoke canvas of 1212″ is the sample. I have 37 layers to work with @ 300 DPI (left). If I lower the DPI to 72, the layer limit increases to 128. (right).
Final Words
By selecting the multiple layers, you can quickly move and group within a second and delete all the layers.
Now you can Do art without wasting time and editing each layer quickly; you can edit only one layer, and all the layers also take effect.
- HTTPS WWW GOOGLE COM GWS_RD SSL WHAT DOES THIS MEAN?
- I Forgot My Xfinity Wi-Fi Password – How to Recover It?
- How to Access Hulu on Roku and Stream? 5 Simple Steps
- How to Get Your School’s Wi-Fi Password from Your Teacher or Friend
- The Hidden Reasons Why Does My Phone Say T-Mobile Wi-Fi Calling
